
Having a strong posterior chain is essential for anyone looking to stay fit - no matter your goals.
Not only does it create an impressive physique, but strengthening the muscles of the back can help improve posture, reduce lower back pain, and build strength in other areas of exercise, such as running or squats.
So, if you're ready to add some serious power to your workout regime, then read on for our rundown of the best posterior chain exercises out there:
Posterior Chain Exercises For Beginners
Here are the best posterior chain workouts beginners can consider getting things started:
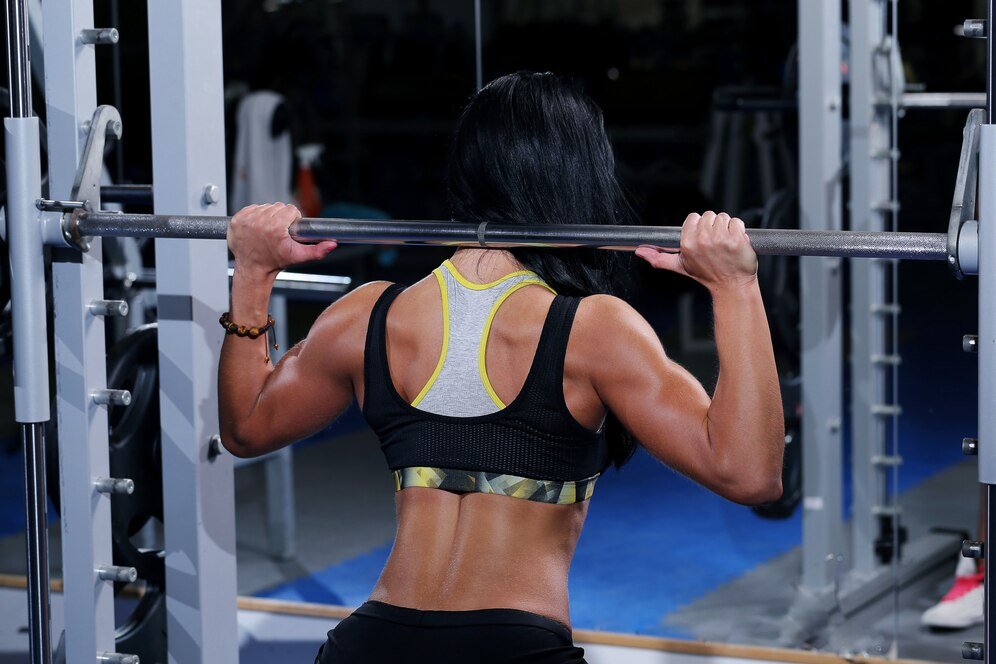
1. Barbell Good Morning

The Barbell Good Morning is one of the best posterior chain workouts for athletes that effectively targets the hamstrings and glutes, helping build strength and improve muscle definition.
Strengthening the posterior chain can help prevent injuries, especially in athletes who engage in running, jumping, and heavy lifting activities.
Step-by-Step Guide
Preparation
- Set up a barbell in a power rack at an appropriate height. The bar should be positioned across your upper back, just below your traps (trapezius muscles).
- Load the bar with weight plates that suit your fitness level and goals. Beginners should start with lighter weights and gradually increase the load as they become more proficient.
Execution
- Positioning: Stand in front of the barbell with your feet shoulder-width apart or slightly wider. Your toes should be pointing forward, and the barbell should rest on your upper back.
- Grip: Place your hands on the bar slightly wider than shoulder-width apart. You can use an overhand grip (palms facing forward) or a mixed grip (one palm facing forward, the other facing backward) based on your preference.
- Engage Core: Before starting the movement, engage your core by drawing your belly button inward and bracing your abs.
- Hip Hinge: Initiate the movement by pushing your hips backward while maintaining a slight bend in your knees. Imagine trying to touch your buttocks to the wall behind you.
- Maintain Posture: Keep your chest up and your back flat throughout the movement. Your head should be aligned with your spine, and your gaze should be forward.
- Lowering Phase: Continue hinging at the hips until your upper body is almost parallel to the ground. At this point, you should feel a good stretch in your hamstrings and tension in your lower back.
- Maintain Neutral Spine: Be cautious not to round your lower back excessively during the descent. Maintain a neutral spine position to protect your back.
- Returning to the Starting Position: To come back up, drive your hips forward and return to the standing position. Squeeze your glutes at the top of the movement.
- Controlled Movement: Perform the exercise in a slow and controlled manner, avoiding any sudden or jerky movements.
2. Romanian Deadlifts

The Romanian Deadlift (RDL) is an effective exercise for targeting the posterior chain, which includes muscles such as the hamstrings, glutes, and lower back. It also helps improve hip mobility and stability.
Since RDLs replicate a common movement pattern used in various activities, they improve functional strength and coordination.
Step-by-Step Guide
Preparation
- Stand with your feet hip-width apart, toes pointing forward, and a slight bend in your knees.
- Hold a barbell with an overhand grip (palms facing you) or a dumbbell in each hand with your arms fully extended, hands shoulder-width apart.
Execution
- Hip Hinge: Initiate the movement by pushing your hips back as if trying to reach back with your buttocks while maintaining a neutral spine (not rounding or arching your back).
- Maintain Posture: Keep your chest up, shoulders back, and core engaged throughout the movement. Your head should be aligned with your spine, and your gaze should be forward.
- Lowering the Weight: As you hinge at the hips, lower the barbell or dumbbells along the front of your thighs while keeping the barbell/dumbbells close to your body. The movement should be controlled and deliberate.
- Stretching Hamstrings: Continue lowering the weight until you feel a good stretch in your hamstrings, but avoid rounding your back excessively. You should feel tension in the back of your legs.
- Maintain Neutral Spine: At the bottom of the movement, your back should be flat and nearly parallel to the ground, and your hips should be pushed back as far as they can go without rounding your lower back.
- Returning to the Starting Position: To come back up, focus on driving your hips forward while maintaining the same posture. Keep the weight close to your body as you rise to the starting position.
- Squeeze Glutes: At the top of the movement, squeeze your glutes to fully extend your hips. Avoid leaning backward excessively; maintain a neutral spine.
- Repetition and Sets: Perform 8-12 repetitions per set. Start with 2-3 sets and adjust the number of sets based on your fitness level and goals.
Advanced Posterior Chain Exercises For Posture
Now, these are advanced exercises for the posterior chain that are sure to produce results:
3. Glute-Ham Raise

The Glute-Ham Raise (GHR) is an advanced bodyweight posterior chain exercise that primarily targets the hamstrings, glutes, and lower back. It involves extending your hips and flexing your knees against resistance to work the posterior chain effectively.
This exercise simultaneously targets multiple posterior chain muscles, promoting overall balance and strength in these muscle groups.
Step-by-Step Guide
Preparation
- Find a Glute-Ham Raise machine or a GHR bench for this exercise. If you don't have access to this equipment, you can use a partner or sturdy object to anchor your feet.
Execution
- Setting Up: Begin by kneeling on the pad of the Glute-Ham Raise machine with your thighs and hips supported. If using a GHR bench, kneel with your knees and hips supported at the edge of the bench, and secure your feet under the provided footpads.
- Positioning: Your upper body should be perpendicular to the ground, and your knees should be slightly behind the pad or edge of the bench. Place your hands on your chest, across your shoulders, or fold them on your chest—choose a comfortable hand position.
- Engage Core: Before starting the movement, engage your core by drawing your belly button inward and bracing your abs.
- Hip Extension: Slowly lower your upper body toward the ground while maintaining a straight line from your head to your knees. You should feel tension building in your hamstrings and glutes.
- Knee Flexion: Once you reach the bottom position, initiate the movement by contracting your hamstrings to flex your knees and pull yourself back up. Your glutes should also be engaged during this phase.
- Maintain Control: Keep the movement smooth and controlled throughout the exercise. Avoid any rapid or jerky movements.
- Full Extension: At the top of the movement, your body should be in a straight line from your head to your knees, and your hips should be fully extended.
4. Hip Thrust

The Hip Thrust is a popular exercise for targeting the glutes and strengthening the posterior chain. It involves hip extension against resistance, making it effective for building glute strength and muscle definition.
Hip Thrusts' hip extension movement pattern replicates movements used in everyday activities and sports, making it a functional exercise.
Step-by-Step Guide
Preparation
- Position a bench or a sturdy elevated surface horizontally to the ground. The height of the bench should be such that when you sit on it, your shoulder blades are comfortably resting on the edge.
- Place a barbell across your hips or use a resistance band just above your knees for added resistance.
Execution
- Setup: Sit on the ground in front of the bench with your back facing the bench. Place your feet flat on the ground, shoulder-width apart, and close to your glutes.
- Positioning: Lean back so that your shoulder blades are resting against the edge of the bench. Your upper back and head should be supported, and your lower body should be hovering above the ground.
- Grip: Hold the barbell with both hands, palms facing up. Alternatively, if using a resistance band, place it just above your knees and make sure it's secure.
- Engage Core: Before starting the movement, engage your core by drawing your belly button inward and bracing your abs.
- Hip Thrust: Push through your heels and drive your hips upward by squeezing your glutes. Lift your hips until your thighs and upper body form a straight line. Your body weight should be supported by your shoulder blades and feet.
- Squeeze Glutes: At the top of the movement, pause for a moment and squeeze your glutes tightly.
- Lowering Phase: Lower your hips back down to the starting position in a controlled manner. Maintain tension in your glutes throughout the movement.
- Repeat: Perform the desired number of repetitions while maintaining proper form.
5. Half Squat

The Half Squat, also known as the Parallel Squat, is a variation of the traditional squat exercise where you only descend halfway down. This exercise is particularly useful for targeting the posterior chain muscles while placing less stress on the knees.
Half Squats can be a time-efficient posterior chain exercise, allowing you to work the posterior chain while spending less time in the squat position compared to full-depth squats.
Step-by-Step Guide
Preparation
- Stand with your feet shoulder-width apart or slightly wider, toes pointing slightly outward.
- Keep your chest up, shoulders back, and engage your core for stability throughout the movement.
Execution
- Hip Hinge: Initiate the movement by pushing your hips back like sitting in a chair. The movement should resemble a hip hinge rather than a knee-dominant squat.
- Knee Flexion: As you hinge at the hips, simultaneously bend your knees to lower your body.
- Half Squat Position: Descend until your thighs are approximately parallel to the ground. Your knees should be at a 90-degree angle or slightly greater, but avoid going lower than parallel.
- Maintain Posture: Keep your chest up, back straight, and head aligned with your spine throughout the movement.
- Knees Aligned: Ensure that your knees are tracking in line with your toes and don't collapse inward or push too far forward.
- Push Through Heels: To return to the starting position, push through your heels, engage your glutes and hamstrings, and extend your hips and knees simultaneously.
- Full Extension: Stand up straight, squeezing your glutes at the top to achieve full hip and knee extension.
Final Verdict
After delving into the best exercises for developing your posterior chain, it's time for you to put these insights into action.
Get out of your comfort zone and test out some good mornings, Romanian deadlifts, and hip thrusts; with proper form and dedication to a good program, you'll be feeling and looking better than ever.
Who knows - maybe those squat posters in the gym will be turned around so people can admire that newly toned posterior chain instead.
In the end, don't forget that when it comes to exercise there's no one-size-fits-all approach; make sure to explore different training styles until you find something that works for you.
Good luck and happy lifting.
