How to Train with your Gripzilla Ultimatum™ Hand Grippers
Gripzilla Ultimatum™ Beginner Program
Congratulations on your purchase of Gripzilla Ultimatum ™ hand grippers. In this article, I'm going to provide you with some tips, tricks, techniques, pictures, and videos that will help you better utilize your grippers and build stronger hands, and give you a sample training program based off of my own training program, which has been working for me. Among all of my grip toys, I prefer my grippers the most because I am able to carry them anywhere and I love to see people's reactions when I show them how to use them. These are not your ordinary grippers that you can squeeze all day!
Why Train With Grippers?
You need strong hands if you're an athlete. There is almost always some movement involving the hands or some transfer of power from your body through the hands. Any athletic endeavor you aspire to achieve will benefit from having stronger lower arms. Several different sports, from football and wrestling to baseball and weightlifting to martial arts and even golf, rely on strong lower arm muscles and grippers are central to this.
It's time to get to work
The Set
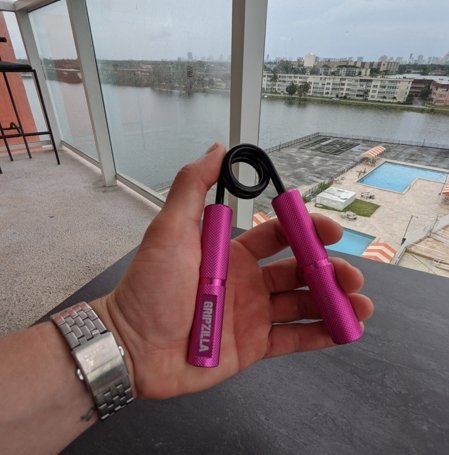
The term "setting" the gripper simply refers to the act of putting the gripper into your hand with your other hand. As you close the gripper, you are also wrapping your pinky around the handle and placing it in a good position to close the gripper. When you fully comprehend how to set the gripper, it may take you a few days or weeks to reap the benefits, but once you do, you will reap them immediately. Your hand will soon find the perfect place for the handle to rest. Thus, you will be able to get the most leverage possible. My left thumb presses firmly into my right hand's palm one gripper handle, while my left index finger pulls the second handle closer so that my pinky can wrap itself around it better. Despite having 8” long hands, I have relatively short fingers and don’t have an easy time closing grippers without a set. See Figures 1 and 2 below, and Figure 3 of the “set” gripper.


Figure 2

Figure 3
Taking the gripper any farther than parallel is a bad idea, and even if you're considering certifying on 500Lb or 400LB, you would only be allowed to position it so that you could get your hands around it. Do not squeeze it too hard so that you end up with parallel handles, as shown in Figure 4. Squeezing it with the other hand is not recommended. You can now close more easily by getting a little more leverage. That seems like a simpler way to do it, doesn't it? Didn't you purchase the grippers hoping for stronger hands?

Work on keeping a very shallow set and practicing 'no-set' closes if you want to develop truly strong hands. A single hand grip is considered a no-set grip because the gripper is not set using the other hand. It is much tougher to squeeze your hands and this will make them stronger. It can be difficult for those without large hands. It is important to understand that hand size should not be used as an excuse to avoid no-set closes when training. Toddler-100, Punisher-200, Bone Crusher-250, and The Gripzilla-300 can be no-set closed if you are able to no-set close the Toddler-100. Strength of hand and not size of hand is the determining factor in grip strength. The thing that makes Gripzilla Ultimatum unique is that all of the grippers are designed with a 2 5/8" handle spread, making it possible for more people to use shallow sets or no sets at all to close the gripper.
In my experience, 9 times out of 10, my first suggestion when meeting a new client and asking advice on grippers is that they arrange their pinky on the handle correctly. Even though it sounds awkward, your pinky halfway off the bottom of the handle gives you more leverage. Even so, you should make sure your pinky is included and not slipping off the handle.
The Squeeze
You then take away your other hand and begin crushing the handles together after the gripper is set. My best advice for this part is to squeeze hard! There isn't much explanation needed for this part. Pinky and ring fingers become more active as the handles near each other.
Grips springs are also a form of dynamic resistance if you're familiar with how rubber bands and chains add tension to a barbell. It teaches you how to lift weights explosively to cut through sticking points that you would normally encounter. In this regard, it is important to close a gripper as fast as possible. The handles will not close nearly as quickly if you don't explosively squeeze them together, and you will be caught at the same frustrating point every time.
Inverted Closes
Because squeezing the gripper while you hold it in the standard position with the spring up targets your index and middle fingers, you should incorporate some 'inverted closes' to build strong hands. Inverted simply means that the spring is pointing downwards. You'll have to take your time setting a gripper in an inverted position. Squeezes with inverted grippers that do not require any setting are also great. Figures 6 and 7 show an inverted set and close.


Training
After you give your hands a workout, they have an amazing ability to recuperate quickly. Ideally, a beginner should only use grippers two to three times a week, and over the course of several weeks, increase the volume and frequency as needed. We will call the goal gripper the Big boy 150. Below is a sample training program to help people close it. The program can be customized according to your gripper goal.
Warm-up:
6-8 repetitions on a very easy gripper each hand. I do this just to get a little blood flowing to my hands. Those cheap store bought grippers work fine for this.
6-8 repetitions with a very easy gripper each hand, but this time do it inverted.
Baby 50 or Toddler 100 Closes – 3 each hand, and 3 attempts inverted
Workout:
150LB (Big Boy) Attempts – 5 each hand, and 5 inverted too
Negatives* with (Punisher)-200LB – 3 negatives each hand, holding for 3-5 seconds each time
Braced or Choked Attempts* on 150LB (Big Boy) – 3-4 each hand depending on how tired your hands are
*Negatives and Braced/Choker Attempts are explained in the Intermediate/Advanced article
Cool-down:
Contrast baths – one bowl filled with hot water and another with cold water. Take your hands and put them into one bowl, slowly stretching and flexing your fingers, and then put them into another bowl. It is important to repeat this several times.
Routine Notes and Progression
The majority of your energy and strength should be directed to squeezing the goal gripper if you are feeling "off" and not at 100% strength. Whenever I squeeze a gripper, I wait no less than a minute for my hands to recover. Continue to use the grippers three times a week for three weeks, then add another workout so that you are using them four times a week. Next week, add one more day. If you're not sure about how often to train, use your best judgment. It is possible that you will take a week off from grip training if you are an advanced grip enthusiast. Having done this several times after slowly increasing volumes, it has been very helpful. In addition to increasing your workouts per week, you should also increase your gripper squeezes (volume).
Bringing a goal gripper to a close can be very rewarding, and it can strengthen your hand to new levels. Get comfortable with the idea of experimenting as you explore training. Taking a week off will help you make any noticeable progress on that last 1/8"!
Wishing you the best of luck and working hard!


